

...i know
lets pretend ive been here for the last 4 months....im very sorry for my lack of postings guys and gals but my home was broken into 2 times!!!! 2 blood times. So i havent had a camera, computer, phone etc for quite some time. However, i have recently moved home and the insurance has been sorted so life is good again. and model time is on the up.
So first of all i'd like to share with you a MASSIVE project for me and what will be my main kick ass entry for the spanish GD this year. This is a piece that will be done slowly in the background whilst other projects are going on,,,but here is a little story/description of it and photos
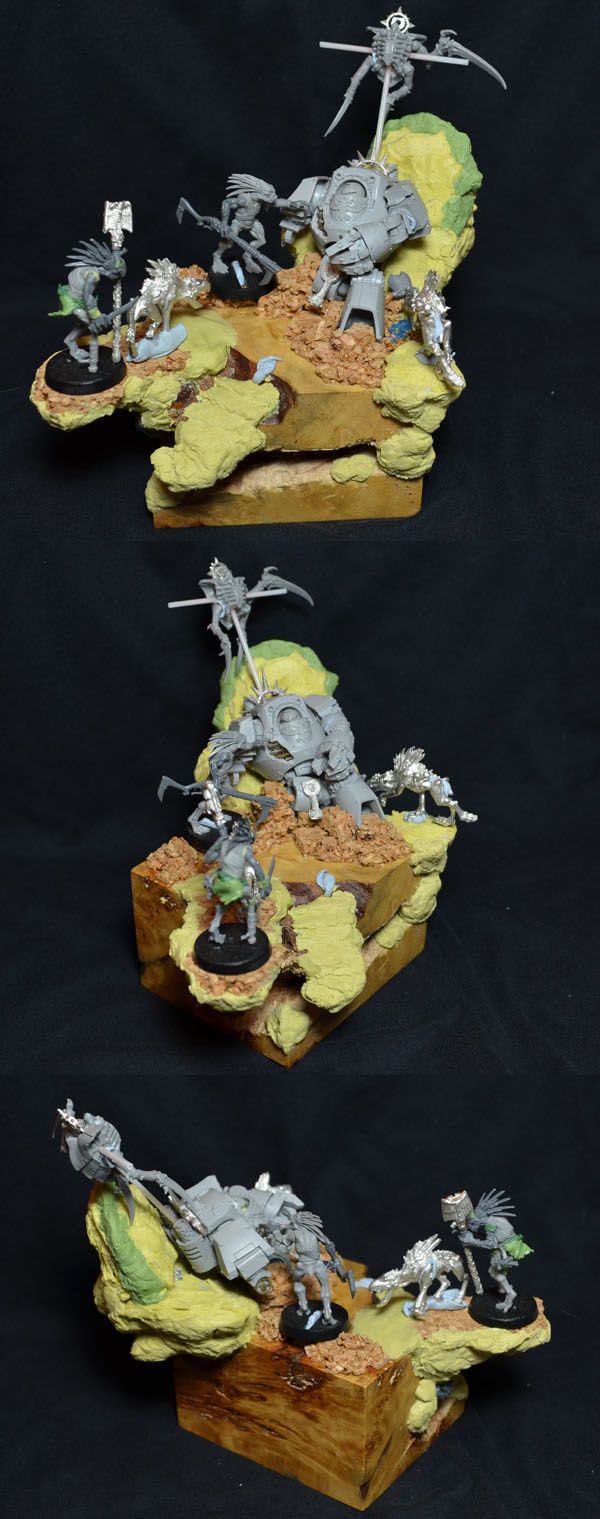
Forgotten Glory
In a desert, against a stone, the contemptor remains. Half buried he slumbers, immobile, presumably dead. One arm clutches the remains of a defeated foe, the skull half buried a short distance away rattling in the wind. The sand has ravaged his armour and no one has seen him in a millennia.
But even this far out, in the desert, a kroot tracker has spotted him and after days of watching the nomad thinks it safe to approach. Wiping away a layer of dust the tracker exposes a beautifully painted shoulder pad and markings of the imperium. A kroot hound tugs at the dreadnoughts fingers to get at the bones it so desperately wants. The tracker is in awe but also disgust, his lightly fitting clothes and assortment of collected items blowing in the wind. Small insects and animals have made a home in the ancient, engine of war. But why was the dreadnought here, what was his objective or what did he die trying to protect? Lying even more silently behind the dreadnought is a relic, older than the contemptor, older than the sands themselves. Now lost. I wonder if the nomad realises what is close at hand. Or does he notice the tiny hint of life emanating from an almost depleted transmitter which shows itself as a slight glow? Either way the space marines will come back one day,,,,but that is for another diorama!
Streetbot willy:
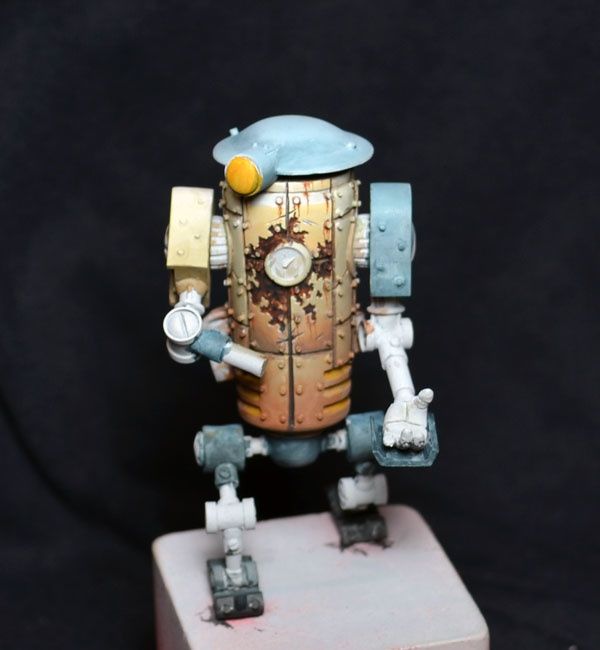
NEXT is a small project im doing for Salute. I started this mini yesterday and ive wanted to paint it for AGES. i have written a small tutorial on painting rust for anyone that is interested :)
ok ladies and gents.......rusty mc rust!
a small tutorial on how i'm doing the rust for anyone thats interested. This is pretty much my first serious attempt at painting rust and its meant to be a practice run for my dio,,,what I'm saying is,,,,anyone can do it if your determined enough. Its a fun mix of being really messy and then being really refined. I'll also try to explain the tiny bit of theory behind the colours I've used in certain places and why.
first of all,,,here is my progress
I will write the stages and there are annotated pictures that follow.
Stage 1)
Stage 1 is pretty simple and literally anyone can do it. slop on some watered down paint in a general rusty pattern. The idea here is NOT to make it a smooth, solid colour so that you get a cool texture instead. This is the only time where it's good to get tide marks etc. i like to do this in 2 or 3 layers because the overlay of thin layers creates a better effect and also keeps the model from going lumpy. I have used VMA tank brown for this. Overall I'm going for a orange/blue scheme and luckily,,,rust is kinda orange ") but you can create a similar effect by using colours that are close to orange or by adding a small amount of orange into a different colour.
but you can create a similar effect by using colours that are close to orange or by adding a small amount of orange into a different colour.
Stage 2)
Stage 2 tries to determine the texture a bit more and give it some depth. Where you think "that kinda looks like a flake" or "that could be a dip" this is the stage to add the shadows for this texture. Also wash the paint toward any crevices. I have added a little bit of dark sea blue to my previous colour for this stage. I will try and stick to my oranges and blues at all times. Blue is good in that it furthers the idea of depth hence why people suggest using blue for shadows (or cold colours in general)
Stage 3)
Stage 3 is similar to stage 2 but i have added black to the mix. It's important at this stage to paint shadows under where the paint has flaked away, simlar to when you paiint chips.
Stage 4)
Darker than black....well more contrast anyway. At this point i have mixed black and dark sea blue pure,,,,no orange in sight. This will create a lot of contrast against the orangey tones. I have concentrated this in crevices and under the clean paint to make the shadow effects stronger.
Stage 5)
This is really the final stage. It's all a bit make or break at this point and it's the only stage where you have to be quite delicate. This is where you pop in some highlights to give a 3d effect. I have used 2 highlight colours in different places. Lower down the plates the colour is quite warm so i have used sw.grey for highlights. I love playing with temp highlights because for me it makes the highlights pop more and its just a bit more interesting (for me). In the slightly cooler upper areas i have used a warm, orange flesh tone for the highlights. Its important not to make smooth sweeping highlights but more like very tiny but rough highlights to add to the chipped effect.
Final)
In my final picture (for this stage) i have also done some rusty streaks and scratches. for the streaks simply water down a deep, warm brown and apply it to the mini, concentrating around rivets etc and very carefully drawing them downwards. The scratches are a mix of blue and black highlighted with a warm, light skin tone! its all about the contrast I have also added highlights inside the rust areas with orange to give some more interest and will touch up a few areas tomorrow to add extra contrast. Sometimes you need a totally dry mini before you can make the final touches.
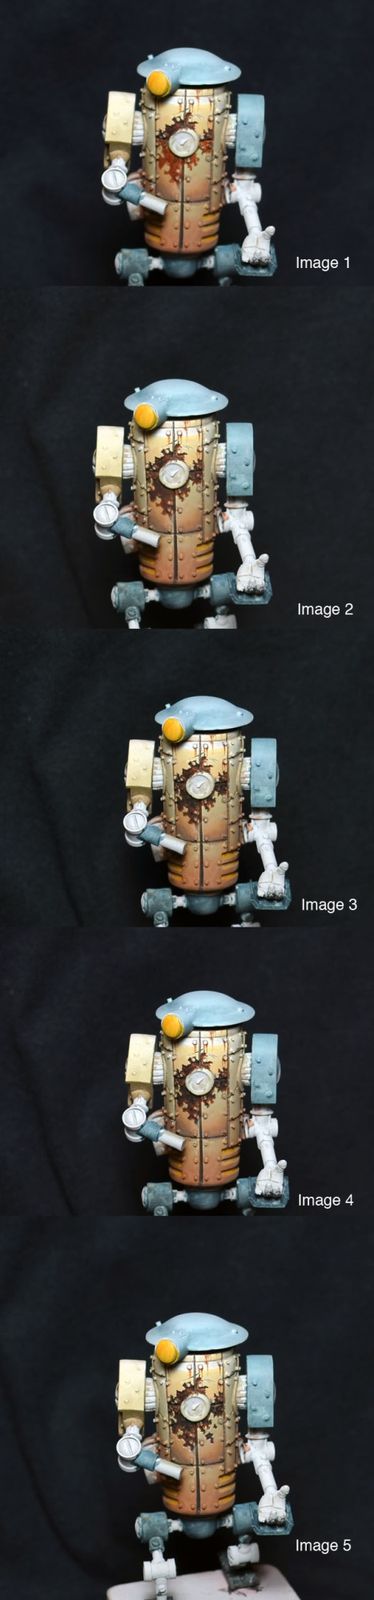
I hope this helps anyone interested in doing rust. shout if you have any questions and let me know what you think of the mini here is a link to better pictures of the wip (overblog screwed my photos :( )
http://platoonbritannica.com/index.php?threads/apas-atelier.98/page-25
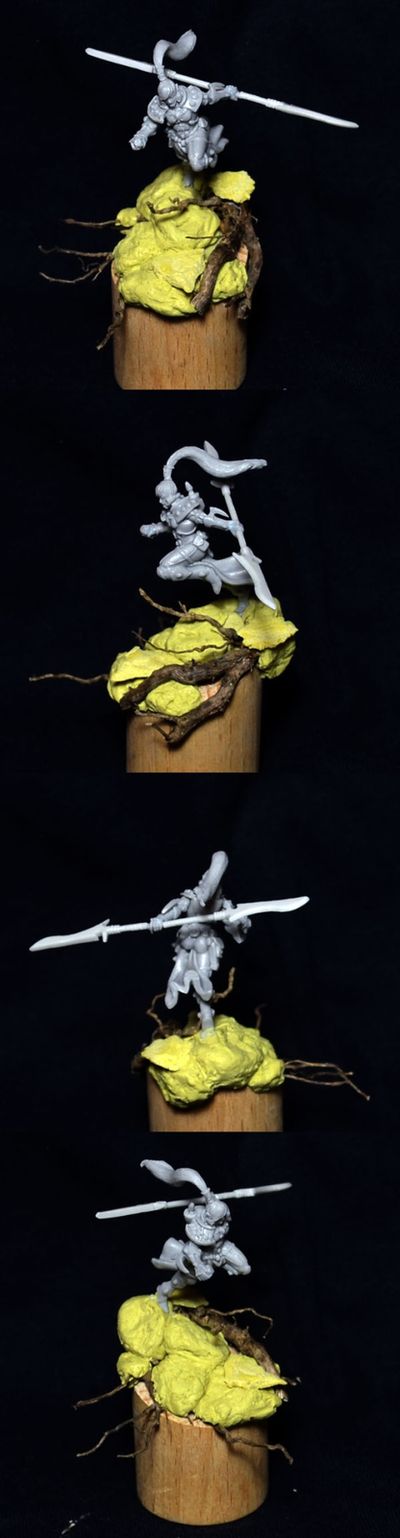
Finally,,,here is a joint project im doing with a good friend of mine called Rich/Build. He is a very talented sculptor and this project will also be going to spain in the open competition IF they allow joint entries. I hate people entering joint entries when its not allowed but if its allowed then why not have some fun :)
ill explain this one in the future,,,but for now you can expect more progress very soon on the robot :)
Happy painting my friends.....and i promise this year to make lots of updates and share as much with you all as i can.
Chris